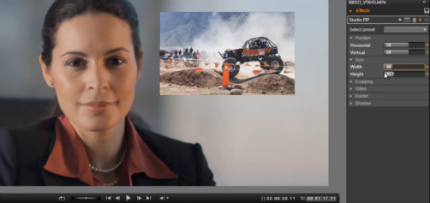
Considering that video is the main method of content delivery in MOOCs, we are going to provide you an overview of one of the most frequently requested type of videos: the interview videos. Also known as “Talking Heads”. There are relatively straight forward to produce.
This article forms integral part of the on line MOOC course Videos for teaching, learning and communication,created by The University of Manchester. It will end the 4th of December. You can still enrol!
Our top tips for filming the perfect talking heads interview are:
• Prepping your subject
It is useful to tell them exactly what will happen in the interview process, without letting them know the questions you are going to ask. You want to capture natural, authentic answers and that tends to be hampered by giving the subject a list of questions prior to the interview. Tell the subject the general topics, that there won’t be any difficult questions and for how long you will interview them. Let them know whether if you will need to film any cutaways of them doing things that they talk about during the interview.
• Wearing the right clothes
As well as the time and place of the interview, inform about which clothes they need to wear. Ask them to dress in their normal clothes but avoiding close repeating patterns as that can play havoc with cameras and clothes with logos in order to avoid any copyright issues.
It can be tempting for subjects to put on a nice dress or their best suit if they know they are going to appear on camera but this may clash with the portrait of the person that you are trying to paint in the video, it’s important to mention whether you want them to be casually dressed or not.
 • Keep accurate notes
Makes a note of anything that the subject mentions that might require clarification. This can be covered either by asking them to explain further or by using a cutaway to give the audience context.
• Selecting the right location
The best location for a talking heads interview is usually one which gives the audience some information about the person being interviewed. Each frame of the video is an opportunity for the filmmaker to communicate information.
Very often the background will be out of focus in order to give the feeling of depth and to concentrate the eye on the subject so the information available might be quite minimal and may just be a subliminal message that the audience pick up on due to the color pallet of the background or the type of environment we see the person in.
• Position the subject correctly for natural light
If windows are behind the subject you may see unwanted reflections of lights and camera equipment. If the sun is shining through it can silhouette the subject and combating daylight with film lights is difficult and may create a lot of heat.
If the window is in front of the subject then you may get varying light levels coming through as the sun goes in and out of clouds or shifts position in the sky. The amount of daylight will also change throughout the course of a day as the sun rises and falls so if you expect the interview to last a long time you may find a jump in light levels if you were to cut a clip from the beginning and middle of the interview together.
• Setup for sound
When location scouting it’s important to listen out for any sounds that may interfere with filming there. Usual culprits are air conditioning, traffic noise and co-workers.
When considering the sound within an interview it’s essential to have a consistent approach as you may find that the editor wants to cut back-to-back clips from several different interviews, either with the same subject or different people. If there’s a significant difference in the audio gathered the audience will find it jarring and will distract them from the narrative.
The audio recorder should always be setup from scratch to ensure that all settings are correct for the situation you are trying to capture.
• Light your subject correctly
There is a traditional lighting setup used for interviews called three point lighting. This setup involves a key light which is the main source of light pointing at the subject. If you have the luxury of seeing the person before the interview you can choose which side of the face to put the key light. You can complement their features by looking at the subject’s face and casting shadows to compensate for any asymmetry.
You may also use a fill light to balance out the amount of light falling on one side of the face and a back light which will help them to stand out from the background. Once you have mastered this technique it is possible to innovate, experiment and chop and change lighting setups to get across the desired tone for the interview.
• Avoid overheating your subject
Heat coming from the lights is also a factor to consider. In small offices, especially in the heat of the summer or foreign locations, you don’t want your subject to feel uncomfortable or to sweat profusely, so choosing a location and lighting setup to suit will be essential. Before filming make sure that you are aware of the availability of power sockets and the amount of current that can be drawn from them (film lights often draw a lot of current and may blow a normal ring main if too many are on at once).
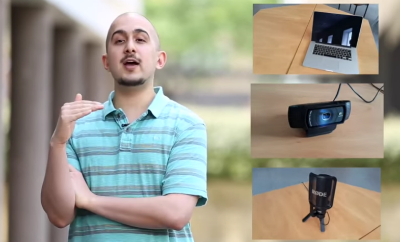
• Position your camera /s
Typically you will use a two camera setup for interview filming. This allows you to cut from a wide shot to a close up during the edit. The advantage of this is it lets you edit the dialogue without the subject jumping position within the frame.
Sometimes you can position the cameras so they are filming the subject from the same angle and other times it will make more sense to position them roughly 30 degrees apart so one gives you a portrait shot and the other gives a three quarter angle view of the subject.
• Produce the key message/s
Deliver key message/s within the interview. There are two approaches that can help ensure that they deliver the appropriate dialogue, each with pros and cons.
Approach one is to use an auto cue. This allows the subject to read from a screen whilst looking into camera. The eye line will remain correct as they are looking through a piece of mirrored glass. The downside to this approach is that unless the interviewee is a seasoned professional, it may come across as stilted or fake as the person will cleat be reading lines.
The second approach allows you to get around this problem by giving the person bullet points that remind them of the key messages. Their dialogue will remain natural but the downside is that their eyes may be seen to flick to one side of the camera as they read the bullet point which may be held up on a sheet of paper by an assistant.
This is also distracting for the audience so the best overall approach is to keep the message short and for the subject to memories the dialogue and key messages – this easier said than done, which is why we stay firmly behind the camera!
You can still enrol! We can’t wait to see what you filmed after completed “Videos for teaching, learning, and communication” – Team UoMan.
Note: Article idea and some texts are taken from: http://boldcontentvideo.com/2015/03/06/10-tips-filming-perfect-talking-heads-interview/