record Archives - Ecolearning

Picture in Picture / PIP video

Videos for MOCCs: Picture in Picture (PIP)

By | News | No Comments

Considering that video is the main method of content delivery in MOOCs, we are going to provide you an overview of  Picture in Picture (PIP) videos for MOOCs.

This article forms integral part of the on line MOOC course Videos for teaching, learning and communication,created by The University of Manchester. It will end the 4th of December. You can still enrol!
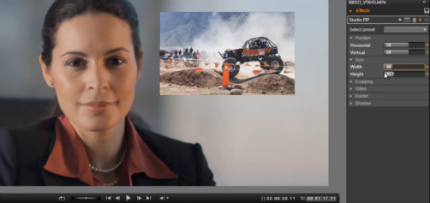
NoPicture in Picture / PIP videowadays, Picture in Picture videos are frequently used to present two different scenes taking place at the same time. Millions of people tend to create picture in picture video while playing games, explaining texts, even promoting products and so on, trying to convey much more information to their viewers in the simplest way.

Traditional techniques for creating picture-in-picture videos are expensive, no portable, or time-consuming.
If you want to show yourself in a video and demonstrate at the appropriate time, well, it is very easy to achieve if you choose the right tool. We have several solutions:

  • Make a video of yourself first and then insert this video into the background video.
  • The other is that you are capable of recording yourself and video at the same time.

Solution 1: Screen Recorder + Editor

Picture in Picture video refers to a video that is put one small video clip over a background one, so we need to prepare two videos at first. You can choose one screen recorder to make the video you plan to present for your students; also, you need a webcam recorder to record yourself. Then, a video editor which allows you to add Picture in Picture effect can help you to create side by side video.

Solution 2: Screen Recorder

Other solution is to use professional screen recorder software that allows you to make side by side video simply in one click. It’s not only a screen recorder but a webcam recorder and a basic editor too.

This technique uses a laptop computer with a video capture device to acquire the ultrasound feed. Simultaneously, a webcam captures a live video feed of the transducer and patient position and live audio. Both sources are streamed onto the computer screen and recorded by screen capture software. This technique makes the process of recording picture-in-picture ultrasound videos more access
ible for ultrasound educators and researchers for use in their presentations or publications.

You can still enrol! We can’t wait to see what you filmed after completed “Videos for teaching, learning, and communication– Team UoMan.

Note: Article idea and some texts are taken from:
https://www.apowersoft.com/forums/topic/create-picture-in-picture-video.html
http://www.jultrasoundmed.org/content/32/8/1493.full.pdf

Voice overs

Videos for MOOCs: Presentation slides with voice-over

By | News | No Comments

Considering that video is the main method of content delivery in MOOCs, we are going to provide you an overview of presentation slides with voice-over videos.

This article forms integral part of the on line MOOC course communication, created by The University of Manchester. It will end the 4th of December. You can still enrol!

A voVoice oversice over is the invisible speaker you hear in TV and cinema commercials, radio spots, e-learning, internet, DVD/CD-ROM, product and company presentations, documentaries, pod-casts, animated films, flash presentations, IVR voice prompts, on-hold marketing, navigation technology, etc.

Adding voice over to existing PowerPoint slides can be a great way to turn slides you’ve used for years into stand-alone flipped content.

The basic functions of PowerPoint are pretty easy to use, but it has many features that can really take your presentation to a new level. The ability to supplement a presentation with voice-over or other audio is one such function.

Adding your voice to PowerPoint slides is a pretty easy process, and it can turn a presentation from a plain set of slides into a self-contained instructional asset that stands alone and can be used by students to self-teach. This can be a great way to test the waters with flipped content delivery.

The basic steps are as follows:

  • Have the right equipment – You’ll need a microphone to record your voice and a working sound-card or integrated audio.
  • Create a new folder and presentation file – As you record narration, sound files will get created as part of the presentation, and having them all in one folder will help you manage them.
  • ‘Record Narration’ tool – Open PowerPoint and find the “Slideshow” command in the top bar. Once you click on “Slideshow”, a menu will appear – select “Record Narration”.
  • Set sound levels and properties – In the “Record Narration” dialogue box that appeared after clicking the previous command, click the “Select Microphone Level” button and use the slider to adjust the microphone’s level to ensure your microphone is recording at optimal sound levels.
  • Recording – To record, simply click “Record Narration” on the Slide Show menu. In the bottom left corner of the “Record Narration” window is a check box for “Link Narrations In” – click this box to check it on (you will need to do this each time you start recording a section of voice-over). You can build out your voice-over gradually from the beginning (in other words, you don’t need to do it all in one take). As you record new sections, you will be prompted each time as to whether you wish start on the first slide or on the current slide.

Note that if want to record over a section you are not happy with, just record over it and your new content will replace your old content (as long as you save it). Once you are done recording a part, hit the “Escape” key and PowerPoint will ask you if you want to save the timings on the slides. Always choose yes. Save your PowerPoint presentation each time you complete any section of narration.

Once you have completed part or all of your narration, play your presentation to watch and hear it. You will probably have to experiment with these steps and the overall process to get through your first voiced-over presentation, but once you’ve done it once, you will know what it takes to repeat the process.

You can save it in a few formats. You may want to try different approaches depending on where you want to deliver it. Depending on the PowerPoint, you can export your enhanced slide deck in WMA format so it plays as a video.

You can still enrol! We can’t wait to see what you filmed after completed “Videos for teaching, learning, and communication” – Team UoMan.

Note: Article idea and some texts are taken from:
http://www.voicearchive.com/faq/#voiceover
http://www.flippedclassroomworkshop.com/5-easy-steps-for-adding-voice-over-to-powerpoint-presentations/
https://www.youtube.com/watch?v=oTlzpwFFvLE